How to Write to NTFS Drives on Mac?

TechsPlace | Apple recently launched macOS Catalina. It is an interesting operating system that the user likes to interact with. However, similar to its predecessors, macOS Catalina does not support reading and writing data format with NTFS.
Despite being one of the best products in the market, the lack of one simple feature makes it incomplete.
Fortunately, there is a solution for that. There is the third-party NTFS for Mac and other complex methods that fill the gap.
What is NTFS?
Before we can start with the solution, you must have a clear understanding of what NTFS is and how it works to make it possible for the Mac operating system to access NTFS formatted data.
NTFS stands for New Technology File System. It was created by Microsoft and didn’t license anyone to utilize it. Sources have it that Apple has tried buying the license, but Microsoft asked for a price that was even expensive for Apple.
NTFS is the standard file system that is being used in the windows operating system. It was first launched in 1993, and since then, the file system has only enhanced its performance.
Now that you know what NTFS all about is let’s get on with the solution that will help you access NTFS formatted files on your Mac operating system.
How to Write NTFS Drives on Mac?
macOS is an exclusive operating system. This is why most of the file system does not work on mac. Besides, Apple’s Mac operating system allows full access to read and write to the FAT family members.
Hence, the Linux file system and Microsoft file system are not compatible with the mac operating system. However, you can use these methods; you will be able to access NTFS drives on your Mac.
Solution 1: NTFS For Mac Software
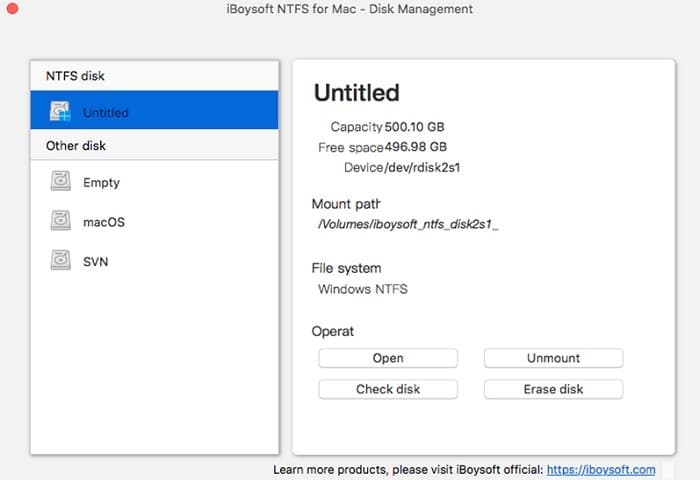
Many software in the market offers their services to the Mac operating by allowing them to access NTFS files. There are paid and free NTFS for Mac. But the free ones are more cumbersome and less secure to mount NTFS partitions in read-write mode. So, we recommend you to use commercial NTFS for Mac apps like iBoysoft NTFS for Mac. The software is the fastest NTFS for Mac I’ve ever seen, whose write speed is equivalent to the native Apple APFS and HFS+. More importantly, the software is fully compatible with M1 Macs and macOS Big Sur.
To use NTFS for Mac software, you simply need to install it and leave the rest on the software.
Whenever you receive data in NTFS format, the software will notify you. There are no additions. The NTFS software will automatically do its job.

Solution 2: Reformat NTFS Drive
If you do not want to invest in any thyroid party software, you can simply reformat the whole drive. However, reformatting sometimes leads to damage to data.
- Connect the NTFS formatted drive with the system.
- Open the disk utility; if you do not know where the utility feature is, Press Command and Space. It will take you to disk utility management.
- Now go to the format option.
- There you’ll be able to customize the setting of the drive of the data. Set up the data or drive according to your needs.
- Once you are sure about the setup, press enter.
Creating a small partition of the hard drives will boost the reformatting process to achieve better performance with disk utility management.
Solution 3: Enable MacOS To Write NTFS Formatted Files
The above methods are risky, especially when you are dealing with sensitive data. Although disk utility is a method to access NTFS formatted files, we do not recommend it. Instead, we ask our readers to go with the Terminal Method.
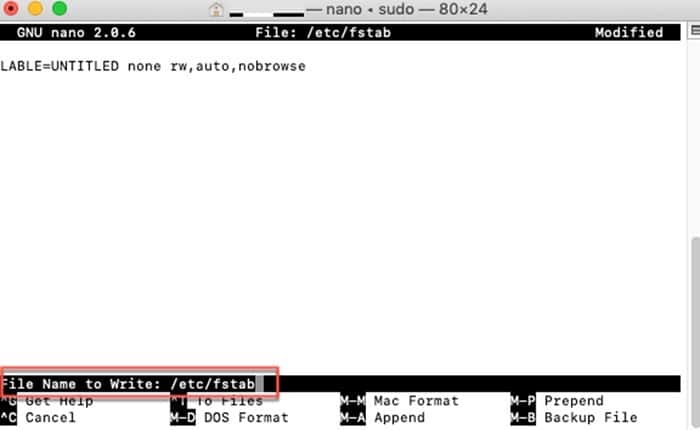
- Open terminal.
- Type the following command line: Sudonano /etc/fstab.
- Now run the command line: LABEL=NAME ra,auto,nobrowse.

- Once the editing is complete, Press Control + X.
- Try reconnecting the NTFS drive or data.
Conclusion
Whenever you come across a file that is being blocked, or you can initiate a write operation, do not panic. There is nothing wrong with the file. It is just that you do not have the right girl system to access the data.
We have talked about three simple methods that will guide you through the processes and unlock those blocked files and folders and will allow you to access NTFS drives.
This article is contributed by guest author on techsplace.com.


