Why And How To Migrate Outlook PST Into Office 365 Cloud

What is Microsoft Outlook & Office 365?
MS Outlook is a Personal Information Manager which is developed by Microsoft. It is mainly used as an email application, including calendar, task manager, contact manager, note taking, magazine, and web browsing. It works with POP3, IMPA & Exchange Server.
Microsoft Office 365 is a web-based email client; it works on Cloud and Exchange Online environment. Presently lots of Outlook users are migrating their data to Office 365 online environment and the reason for the same is simple i.e., “Reliability” and “Access Anywhere” Feature.
Why the Organizations are migrating from Outlook/Exchange on-premise to Office 365?
The Office 365 is the latest application of Microsoft. It works on Cloud platform and provides many advance or latest features.
- Provides the Server and maintenance: The Microsoft Office 365 provides the Exchange Online environment and it’s very safe & secure. It maintains all mailboxes on Cloud platform.
- Business growth: The Exchange Online helps you to increase growth your business.
- Access anywhere with any device: With the office 365 you can access your mailbox or other applications from anywhere, anytime and with any device.
- Provides all apps in one place: O365 environment provide the all required application in one place by which you can easily use these apps.
- OWA (Office Web Apps): OWA is the Outlook web Application that means you can use the Outlook application on the Web.
- Work with SharePoint: SharePoint is a web-based collaborative platform that integrates with Microsoft Office. It helps users to create site or share work or files with the team.
- Skype for business: O365 provide the Skype for the business, with this application a person can easily connect with the other person by message, audio or video calling.
- Control Data Losing: Microsoft’s Office 365 provides a service for Data Loss Prevention it is also known as DLP.
You must read: Export Thunderbird Mail OR Apple Mail To Outlook In PST Format
Possible Methods to Move from MS Outlook PST to Office 365
There are two processes by which you can easily import the PST file data like emails, contacts, calendars, appointments, with all attachments. Here we are discussing all the possible methods you can use any one of them.
Method 1: Convert PST file into Office 365 using Network Upload Method
This is a manual method which is provided by Microsoft and follows all the given instructions for using this process.
Step 1: First, login your Office 365 Administrator account then go to the Admin Center and choose Exchange.
Step 2: Now the Exchange Admin Center window will open. Here you need to click on Permissions, and you will see few options so hit on Organization Management. >> + sign >> Scroll down the list and choose Mailbox Import Export option and click Add >> Ok
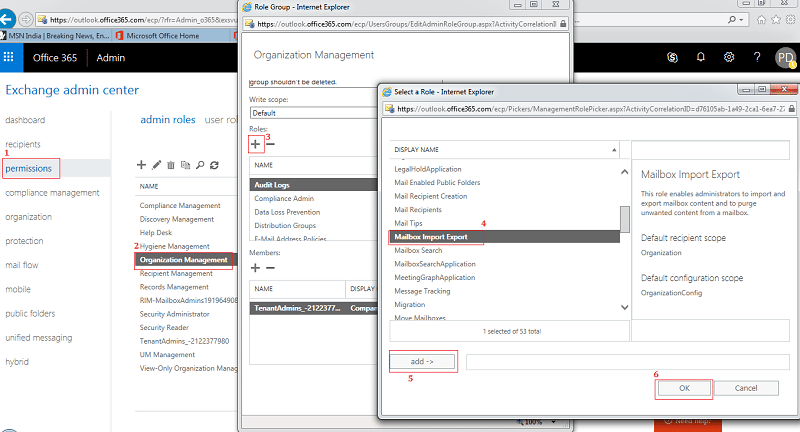
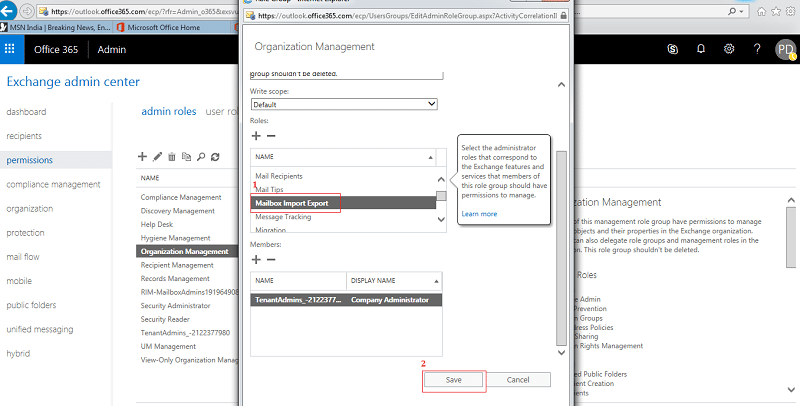
Step 3: After that select the Mailbox Import Export again and Save it.
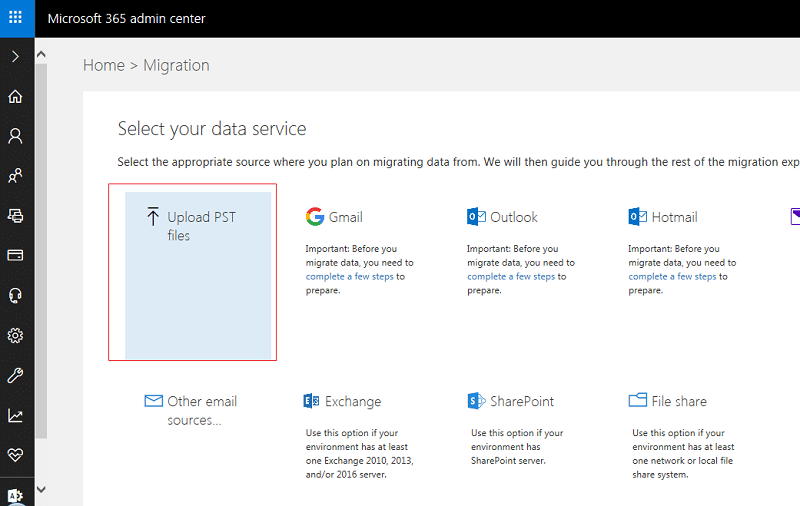
Step 4: Once it done you needs to go back on the Admin page and select Data Migration option on Setup. A new window will open, click Upload PST file.
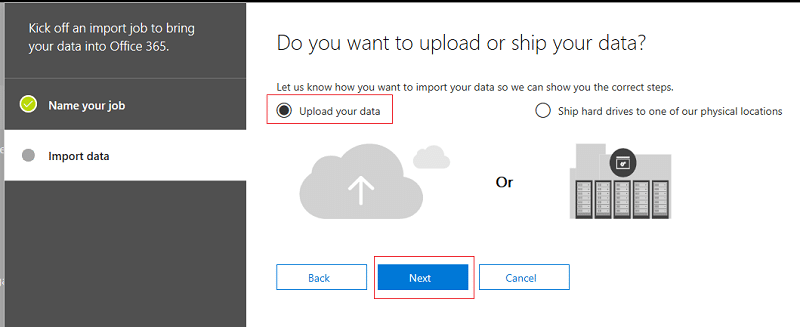
Step 5: Now upload the PST by clicking Upload PST files option, then click New Import Job and put the job name and Next >> select Upload your data and hit Next.
Step 6: After that you need to fine the SAS URL by hitting on Show network upload SAS URL and click download Azure AzCopy to install the Azure tool.
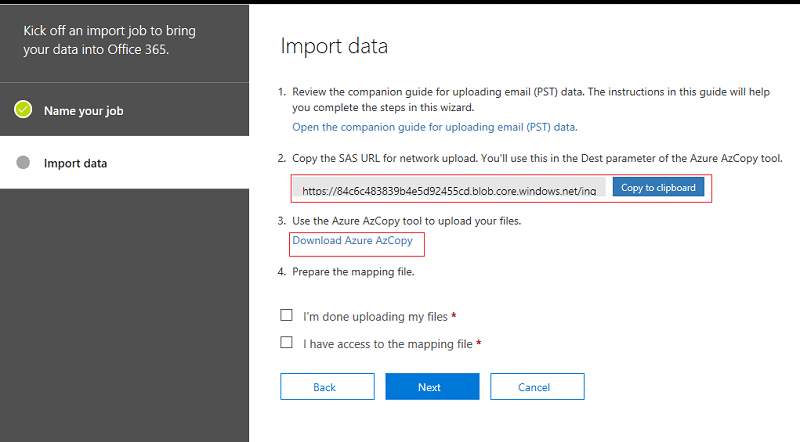
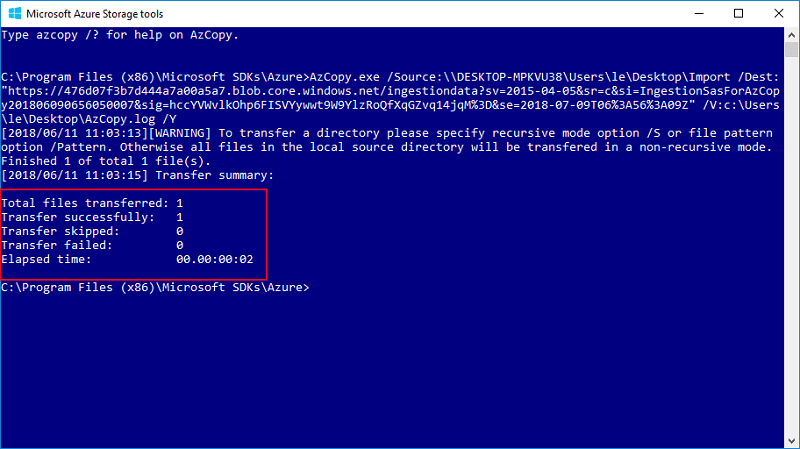
Step 7: Lunch the installed Microsoft Azure Storage AzCopy tool and write the below command on that application.
AzCopy.exe /Source:\\network path /Dest:”SAS URL” /V: give location where you want to save log file \AzCopy.log /Y
Note: While you are typing the file location you have to provide the Sharing Permission for the PST file or folder. Follow the instruction to know how to give the Sharing Permission.
- First write click on folder or file then go to properties.
- Now click Sharing >> Share.
- After that Choose the option like everyone >> Add and click Share >> Done.
After type the command just press the Enter key on the keyboard and you can see that your PST file successfully upload into Azure AzCopy tool.
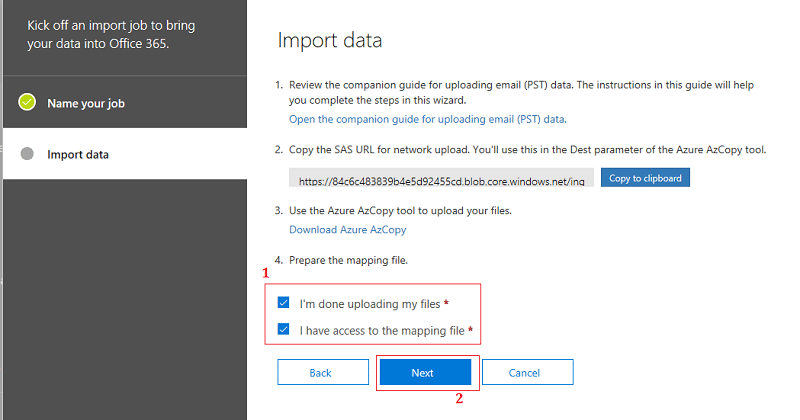
Step 8: Go to the previous window and click to the Preparing the mapping files options>> Next.
Step 9: Here you will see the select the mapping file option. For this you have to create a CSV file, so open the Excel and create the CSV file like this:
| Workload | FilePath | Name | Mailbox | IsArchive | TargetRootFolder |
| Exchange | backup.pst | somit@l.onmicrosoft.com | FALSE |
Click Select mapping file option and upload the CSV.
Once it upload you need to validate it>> Save.
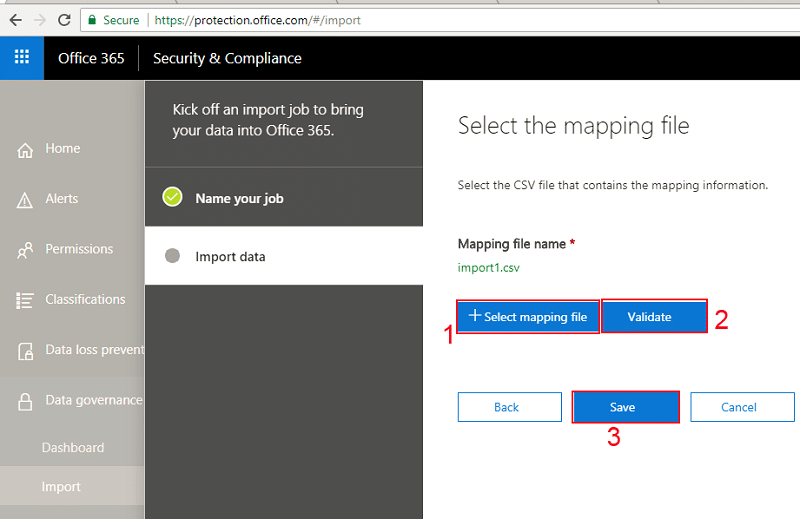
After click on save you will see that the PST file has been successfully upload into Office 365 mailbox.

Method 2: Using a third-party solution to import PST into office 365
Sometimes the non-technical users need an easy solution to convert PST file data into Office 365. Because they people face the problem with the PowerShell commands. That’s why here we explain the best option which is the third-party application and we are recommended you the MailsDaddy PST to Office 365 Migration Tool for converting all PST file data like emails, contacts, calendars with the attachments into Exchange Online Mailbox.
This PST to Office migration software has many advanced features:
Export selected items: With this option you can convert only the required and selected PST files data into Office 365.
Data Range Filter Option: The tool provides the Data Range filter by which you can search and Export the selected data range PST file items into O365 Cloud Platform.
Bulk Export feature: With this feature you can easily import the multiple PST files in multiple Office 365 mailbox by creating the CSV file. You need to type the PST file location, mail ID, and password in the CSV file.
Impersonation Option: You can also use this option for migrating multiple PST files into multiple Office 365 Mailboxes with creating the CSV file. For using Impersonation Export option, the users have to give the application impersonation rights and full access to the Administrator mailbox account.
Follow all the instructions to know how the tool works.
Step 1: Download the MailsDaddy PST to Office 365 Migration Tool and install the application.
Step 2: Now lunch that software and upload the PST file by clicking Add file option.
Step 3: Once you the will upload in this tool, it will show the preview of the PST file items including all attachments.
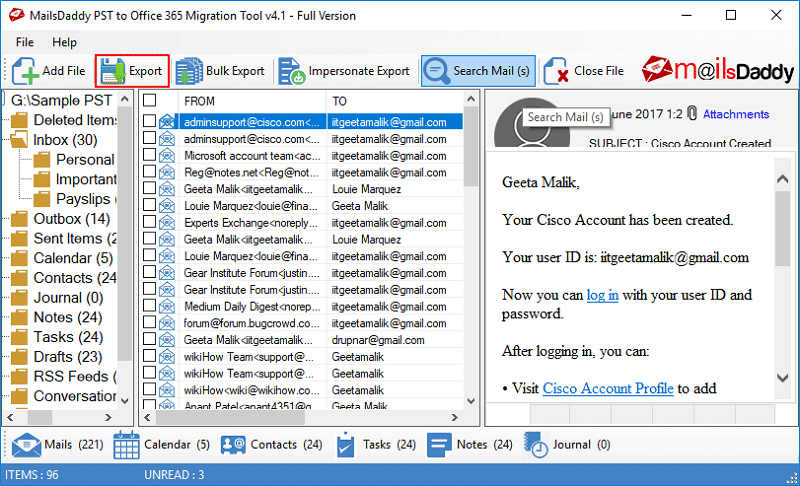
Step 4: You can also select the PST items like emails, contacts, calendars, appointments, and attachments etc. to export the required data.
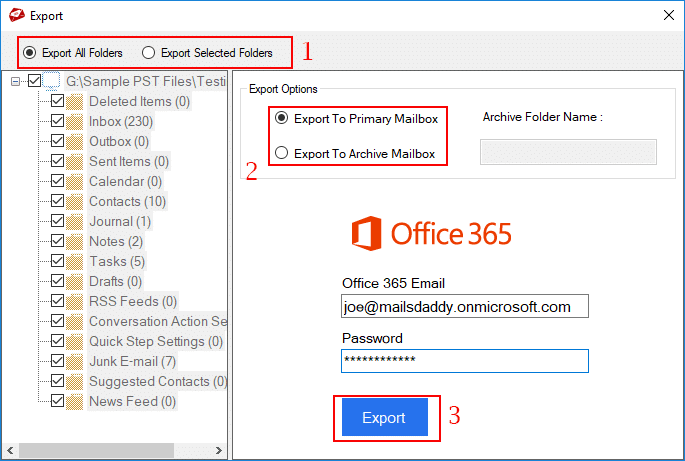
Step 5: After that click Export button for migrating PST to O365 Exchange Online.
Step 6: Choose the export option then type O365 account ID and password and hit on Export option.
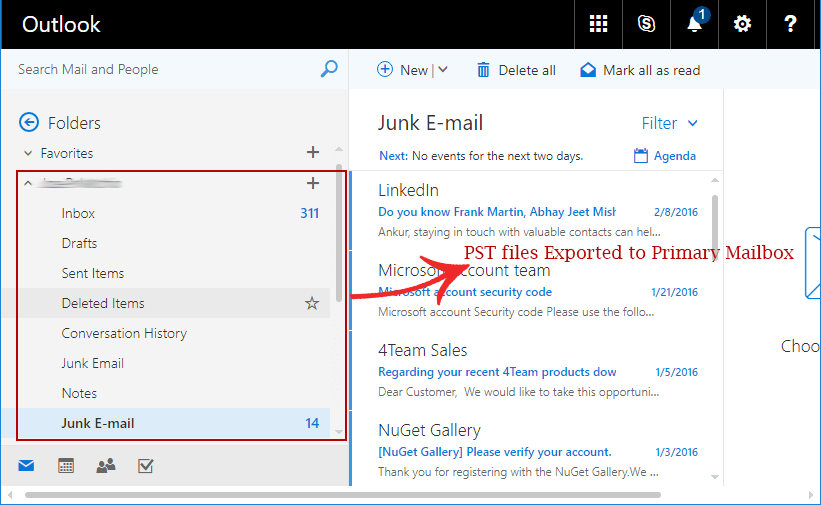
Step 7: At the end just check the Office 365 mailbox your PST will successfully import into Office 365 Cloud mailbox. That’s it.
Conclusion
In this article, we explained you that why and how to migrate Outlook PST file data into Office 365 Cloud Platform, and here we also discussed two methods one is the manual process and another is third-party solution you can use any one of them as per your requirement. If you still have any doubts then leave a message on the comment box. We will be happy to fix your problem.

This article is contributed by guest author on techsplace.com.


